Are you ready to make mealtime easier? Batch cooking Spicy Chickpea and Spinach Wraps is the answer. This guide will show you how to prepare these tasty wraps in advance, saving you time and energy. You’ll love the blend of spices and nutrients packed into each bite. Let’s dive into the ingredients and steps to create wraps that you can enjoy all week!
Why I Love This Recipe
- Quick and Easy: This recipe can be prepared in just 30 minutes, making it perfect for busy weeknights.
- Nutritious Ingredients: Packed with protein from chickpeas and vitamins from spinach, these wraps are a healthy choice.
- Customizable: Feel free to add your favorite veggies or switch up the spices to suit your taste!
- Meal Prep Friendly: These wraps store well in the fridge or freezer, making them great for batch cooking.
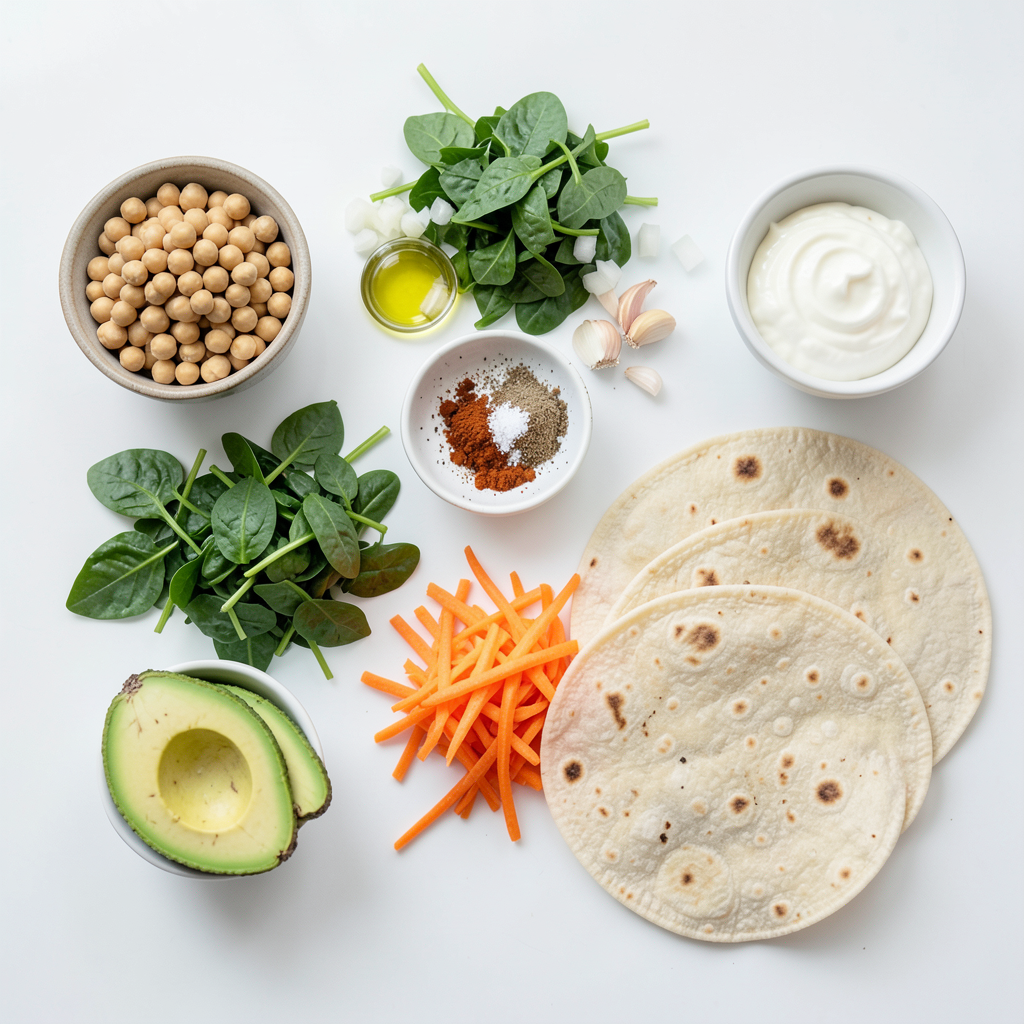
Ingredients
Essential Ingredients for Spicy Chickpea and Spinach Wraps
To make these wraps, you need some key items:
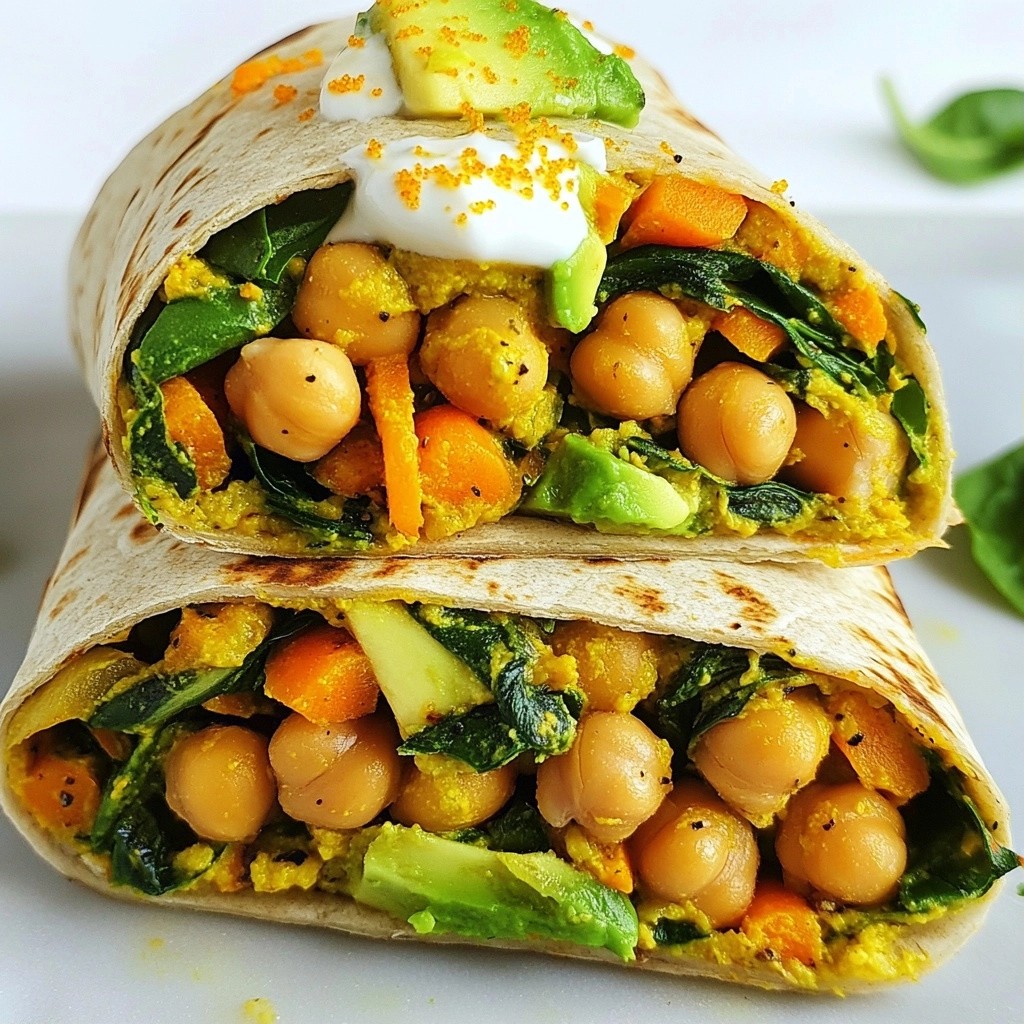
- 2 cans (15 oz each) chickpeas, drained and rinsed
- 4 cups fresh spinach, roughly chopped
- 1 medium onion, chopped
- 3 cloves garlic, minced
- 1 tablespoon olive oil
- 1 tablespoon ground cumin
- 1 teaspoon smoked paprika
- 1 teaspoon chili powder
- Salt and pepper to taste
- 1 cup shredded carrots
- 4 large whole wheat tortillas
- 1 avocado, sliced
- 1/2 cup Greek yogurt or plant-based yogurt (for serving)
These ingredients come together to create a tasty, filling meal.
Optional Ingredients for Customization
Feel free to switch things up! You can add or replace ingredients to suit your taste. Here are some ideas:
- Add cooked quinoa for extra protein.
- Use different greens like kale or arugula.
- Mix in corn or bell peppers for added crunch.
- Top with hot sauce for a spicy kick.
Customizing these wraps can make them even more fun.
Nutritional Overview of Key Ingredients
Let's look at why these ingredients are great for you:
- Chickpeas are packed with protein and fiber. They help fill you up.
- Spinach is full of vitamins and minerals, helping keep you healthy.
- Olive oil is a good fat, great for heart health.
- Carrots add sweetness and are rich in beta-carotene, good for your eyes.
- Avocado gives healthy fats and makes the wrap creamy.
These ingredients not only taste great but also support your health.
Step-by-Step Instructions
Step 1: Sautéing the Aromatics
Start by heating 1 tablespoon of olive oil in a large skillet over medium heat. Once hot, add 1 chopped onion. Sauté the onion for about 3 minutes until it turns translucent. Then, add 3 minced garlic cloves. Cook for another 1-2 minutes until the garlic smells great. This step builds a nice base flavor for the wraps.
Step 2: Cooking the Chickpeas with Spices
Next, drain and rinse 2 cans of chickpeas. Add the chickpeas to the skillet with the onion and garlic. Sprinkle in 1 tablespoon of ground cumin, 1 teaspoon of smoked paprika, and 1 teaspoon of chili powder. Season with salt and pepper to taste. Stir well, making sure the chickpeas are coated in spices. Cook for about 5-7 minutes, stirring occasionally. This gives the chickpeas a lovely flavor.
Step 3: Incorporating Spinach and Carrots
Now it’s time to add some greens. Stir in 4 cups of roughly chopped fresh spinach and 1 cup of shredded carrots. Cook until the spinach wilts down, which should take about 2-3 minutes. Once done, remove the skillet from heat and let the mixture cool slightly. This mix adds great nutrition and color to your wraps.
Step 4: Assembling the Wraps
Lay out 4 large whole wheat tortillas on a clean surface. Spoon a generous amount of the chickpea and spinach mixture onto each tortilla. Add a few slices of avocado on top for creaminess. This step makes your wraps not just tasty but also visually appealing.
Step 5: Wrapping Techniques
To wrap, fold the sides of the tortilla over the filling first. Then, roll up from the bottom tightly to secure everything inside. Make sure it’s snug but not too tight, so the filling doesn’t spill out. Repeat this with the remaining tortillas. A good wrap keeps all the goodness inside.
Step 6: Storage Instructions
If you plan to batch cook, store the wraps in an airtight container. In the refrigerator, they last for up to 4 days. For longer storage, freeze them for up to a month. When you’re ready to eat, simply heat them in a skillet or microwave. Serve with Greek yogurt drizzled on top or as a dip for extra flavor.
Tips & Tricks
Best Practices for Batch Cooking
When batch cooking, start with a clean workspace. Gather all your ingredients first. This saves time and helps you stay organized. Cook in large batches and store portions in airtight containers. This keeps your meals fresh. Label your containers with the date. This way, you know when to eat them.
How to Enhance Flavor with Additional Spices
To boost flavor, try adding extra spices. Consider cayenne pepper for heat. A pinch of turmeric adds warmth and color. Fresh herbs like cilantro or parsley add brightness. You can also squeeze lemon juice for a tangy twist. Experiment with spices to find your favorite mix.
Recommended Cooking Equipment for Efficiency
Use a large skillet or sauté pan. A heavy bottom helps cook evenly. A sharp knife makes chopping easy. A sturdy cutting board gives you a stable surface. Invest in good storage containers to keep meals fresh. These tools help you cook faster and enjoy your wraps more.
Pro Tips
- Fresh Spinach is Key: Using fresh spinach instead of frozen helps maintain the vibrant color and texture in your wraps.
- Spice it Up: Adjust the amount of chili powder based on your spice tolerance for a personalized kick.
- Perfect Tortilla Technique: Warm the tortillas slightly before assembling to make them more pliable and easier to wrap.
- Customization is Essential: Feel free to add other veggies like bell peppers or zucchini to the chickpea mixture for added nutrition and flavor.
Variations
Dietary Adaptations: Vegan and Gluten-Free Options
You can easily make these wraps vegan and gluten-free. To make it vegan, simply replace Greek yogurt with a plant-based yogurt. You can also use any dairy-free sauce you like. For gluten-free wraps, choose tortillas made from rice or corn. This way, all can enjoy these delicious wraps without worry.
Flavor Variations: Adding Different Vegetables or Proteins
Feel free to mix things up! You can add bell peppers, zucchini, or mushrooms for more flavor. Adding extra veggies boosts nutrition and taste. If you want more protein, try adding cooked quinoa or lentils. These options keep the meal hearty and filling. The wraps will stay flavorful and exciting with different combinations.
Serving Suggestions: Sides and Dips
Pair these wraps with some tasty sides. A fresh salad or roasted veggies goes well with them. You can also serve them with hummus or salsa as a dip. For added creaminess, drizzle some extra yogurt on top. These sides enhance the meal and make it more fun to eat. Enjoy your wraps with these tasty additions!
Storage Info
Proper Refrigeration Techniques
To keep your wraps fresh, store them in an airtight container. Make sure the container seals tightly. Place a piece of parchment paper between each wrap. This keeps them from sticking together. You can store them in the refrigerator for up to four days. Always check for any signs of spoilage before eating.
Freezing Guidelines for Long-Term Storage
If you want to save your wraps for later, freezing is a great option. Wrap each one tightly in plastic wrap or aluminum foil. This helps prevent freezer burn. Then, place them in a freezer-safe bag or container. You can keep them frozen for up to a month. When you are ready to eat, just thaw them in the fridge overnight.
Reheating Instructions for Optimal Texture and Flavor
For the best taste and texture, reheat your wraps in a skillet. Heat the skillet over medium heat. Place the wrap in the skillet for about three to four minutes on each side. This will warm them through and make them crispy. If you are in a hurry, you can use the microwave. Heat on high for about one to two minutes. Remember to check that they are warm throughout before serving. Enjoy them with a dollop of Greek yogurt for added flavor!
FAQs
Can I use canned chickpeas for this recipe?
Yes, canned chickpeas work great for this recipe. They save time and add convenience. Just drain and rinse them well before using. This step removes excess sodium and improves flavor.
How long do the wraps last in the refrigerator?
These wraps can last up to four days in the refrigerator. Store them in an airtight container to keep them fresh. Always check for signs of spoilage before enjoying them.
Can I make these wraps ahead of time?
Absolutely! You can make these wraps ahead of time for quick meals. Prepare the filling and assemble the wraps. Then, store them in the fridge or freeze them for later use.
What can I substitute for Greek yogurt?
If you prefer a dairy-free option, use plant-based yogurt instead. You can also try hummus or mashed avocado for a creamy texture. Each option brings a unique taste to your wraps.
Are there any alternative tortilla options I can use?
Yes, you can use any tortilla type you like. Corn, spinach, or gluten-free tortillas all work well. Choose a type that fits your dietary needs or personal taste.
Spicy chickpea and spinach wraps are simple and tasty. We covered key ingredients and steps to make them. Customizing with optional items can match your taste. Remember to store them correctly for freshness. These wraps are great for meal prep and fit various diets. Enjoy experimenting with flavors and sides. With these tips, you can create delicious meals quickly and easily. Happy cooking!