Looking for a quick and easy breakfast solution? My Cheddar and Tomato Omelette Cups are designed for busy mornings. These delicious cups are packed with protein, cheese, and fresh veggies. Plus, you can make them ahead of time! In this post, I’ll guide you through simple steps, clever tips, and exciting variations. Say goodbye to boring breakfasts and hello to tasty convenience! Let’s get started on your new favorite meal!
Why I Love This Recipe
- Quick and Easy: This recipe takes just 10 minutes of prep time, making it perfect for busy mornings.
- Customizable: You can easily swap out the cheese or add different vegetables based on your preferences.
- Meal Prep Friendly: These omelette cups can be made in advance and stored in the refrigerator for a quick breakfast option all week.
- Deliciously Flavorful: The combination of sharp cheddar cheese and fresh tomatoes creates a mouthwatering taste in every bite.
Ingredients
Main Ingredients
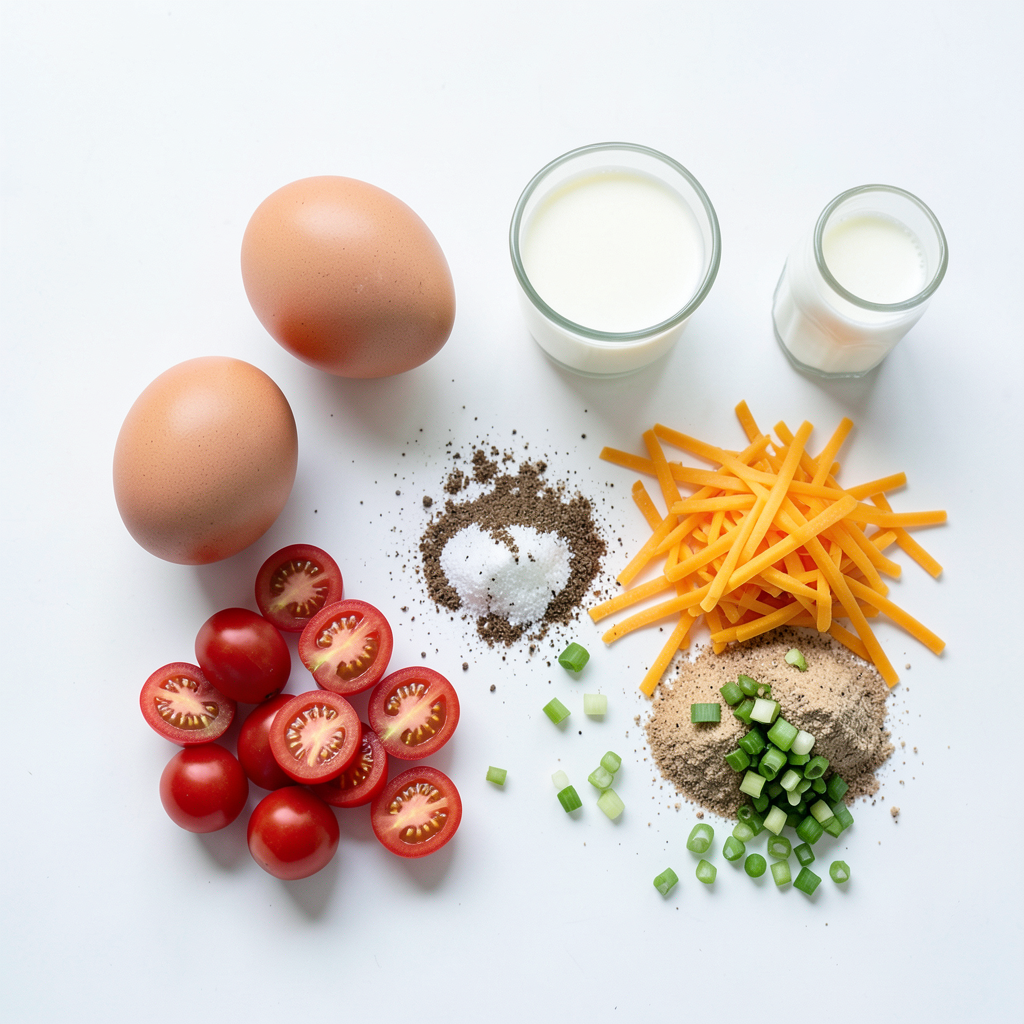
- 6 large eggs
- 1 cup cherry tomatoes, halved
- 1 cup shredded sharp cheddar cheese
Seasoning and Extras
- 1/4 cup milk
- 1/2 teaspoon salt
- 1/4 teaspoon black pepper
- 1/4 teaspoon garlic powder
- 2 green onions, finely chopped
Cooking Supplies
- Cooking spray or olive oil for greasing
- Muffin tin
Gathering the right ingredients is key to success. You want fresh eggs and vibrant tomatoes for the best flavor. I recommend using sharp cheddar cheese for a rich taste. The milk makes the eggs creamy. Add salt, pepper, and garlic for a flavor boost. Green onions bring a nice crunch and brightness.
Make sure you have a muffin tin ready. Grease it well to help the omelette cups pop out easily. Cooking spray works great, but olive oil is a tasty choice too. With these ingredients and supplies, you're set to create Cheddar and Tomato Omelette Cups. Enjoy the process and get ready for a fun cooking experience!
Step-by-Step Instructions
Preparing the Muffin Tin
- Preheat your oven to 375°F (190°C).
- Grease a muffin tin with cooking spray or olive oil.
Start by heating your oven. The right temperature is key for cooking. Greasing the muffin tin helps the cups come out easily. This step makes cleanup simple and ensures a great finish.
Mixing the Ingredients
- Whisk eggs with milk and seasoning.
- Fold in tomatoes, cheese, and green onions.
In a large bowl, crack the eggs. Whisk them until they’re nice and mixed. Add milk, salt, pepper, and garlic powder. Mixing these well makes a tasty base. Then, gently fold in the halved cherry tomatoes, shredded cheddar cheese, and chopped green onions. This adds color and flavor, creating a fun blend.
Baking the Omelette Cups
- Pour egg mixture into muffin cups.
- Bake and monitor for doneness.
Pour the egg mix into each muffin cup. Fill them about three-quarters full. This gives them room to puff up. Place the tin in the oven. Bake for about 18-20 minutes. Keep an eye on them until they are puffed and golden. When done, take them out and let them cool a little. Use a knife to help release the cups. This makes serving easy and fun!
Tips & Tricks
Perfectly Fluffy Omelette Cups
To make your omelette cups light and fluffy, whisk the eggs well. This adds air, which helps them rise. Mix until the liquid is smooth and all the yolks are broken.
For even cooking, fill each muffin cup about three-quarters full. This helps them cook uniformly. Keep an eye on them while baking. The tops should puff up and turn golden, showing they are done.
Serving Suggestions
Omelette cups pair well with fresh fruits, toast, or a light salad. Consider adding a dollop of salsa or a side of avocado for some extra flavor.
If you have leftovers, store them in an airtight container. They can last up to five days in the fridge. Serve them warm or cold for breakfast or a quick snack.
Reheating Guide
To reheat your omelette cups without losing texture, the oven is best. Preheat the oven to 350°F (175°C) and place the cups on a baking sheet. Heat for 10-15 minutes until warm.
If you prefer the microwave, place one or two cups on a microwave-safe plate. Heat them for about 30 seconds on high. Check if they are warm; if not, heat for an extra 10 seconds.
Pro Tips
- Fresh Ingredients: Use fresh cherry tomatoes and green onions for the best flavor. They enhance the overall taste and texture of the omelette cups.
- Cheese Variations: Experiment with different types of cheese like feta or mozzarella for a unique twist on the classic flavor profile.
- Customize with Veggies: Feel free to add other vegetables such as bell peppers or spinach for extra nutrition and color.
- Batch Cooking: These omelette cups are great for meal prep! Make a double batch and freeze them for a quick breakfast option on busy mornings.
Variations
Ingredient Swaps
You can change the cheese in these cups for more flavor. Try feta or mozzarella. Both melt well and bring a unique taste. If you want more veggies, add bell peppers or spinach. They add color and nutrients. For meat lovers, diced ham or cooked bacon makes a great addition too. Just keep the same egg mixture.
Flavor Enhancements
Herbs and spices can really boost flavor. Try adding fresh basil or parsley for a fresh touch. You might also like a pinch of paprika or chili powder for some heat. Mixing in your favorite salsa or a creamy sauce before serving adds excitement too. It gives a fresh twist and makes each bite special.
Different Serving Styles
These omelette cups can also be mini frittatas. Just pour the mixture into a larger pan instead of muffin cups. Bake until set, then slice into wedges. Serve with a side of yogurt or a simple salad. It’s a fun way to enjoy the same flavors in a new way. You can also dip the cups in salsa or guacamole. This adds flavor and makes them more fun to eat.
Storage Info
Refrigeration Guidelines
To keep your cheddar and tomato omelette cups fresh, store them in an airtight container. This helps prevent air from getting in and drying them out. Make sure the cups are cool before sealing the container. You can store them in the fridge for up to 5 days. If you want to enjoy them later, consider freezing.
Freezing Instructions
Freezing omelette cups is simple and keeps them fresh. Follow these steps:
1. Allow the omelette cups to cool completely.
2. Place them in a single layer on a baking sheet.
3. Freeze for about 1-2 hours until solid.
4. Transfer the frozen cups to an airtight freezer bag or container.
For best results, eat them within 2-3 months. When you’re ready to eat, thaw in the fridge overnight. To reheat, pop them in the microwave or oven until warm.
Ideal Packaging
The right container makes a big difference. Use sturdy, airtight containers for storing. Glass or BPA-free plastic options work well. When freezing, ensure you leave some space in the container for expansion. This helps prevent moisture and spoilage. Always label your containers with the date to keep track of freshness.
FAQs
Can I make these omelette cups ahead of time?
Yes, you can make these omelette cups ahead of time. They are perfect for meal prep. Make a batch on the weekend, and enjoy them all week. After baking, let them cool completely. Place the cups in an airtight container. Store them in the fridge for easy access.
How long do the omelette cups last in the refrigerator?
These omelette cups last up to 5 days in the refrigerator. To keep them fresh, ensure the container is airtight. Check for any signs of spoilage before eating. If they look or smell off, it’s best to discard them. Reheat in the microwave for a quick meal.
Can I vary the ingredients?
Absolutely! You can change the ingredients to suit your taste. Try using different cheeses like feta or mozzarella. Add other veggies such as spinach or bell peppers. For protein, include cooked bacon or sausage. This recipe is flexible, so feel free to get creative.
These omelette cups are easy to make and fun to customize. You start with eggs and cheese, then add your favorite veggies. Remember to preheat your oven and prepare your muffin tin. Once baked, these cups make a great breakfast or snack. Store leftovers properly to keep them fresh. Feel free to experiment with different ingredients and flavors. You can easily adjust this recipe to match your taste. Enjoy your cooking adventure!