Are you ready to whip up a quick and tasty meal? My Honey Garlic Shrimp recipe is here to save the day! In just a few easy steps, you'll create a flavorful dish that impresses everyone. With simple ingredients and helpful tips, you'll be cooking like a pro in no time. Join me as we dive into this delightful recipe that’s perfect for any busy schedule!
Why I Love This Recipe
- Quick and Easy: This recipe comes together in just 15 minutes, making it perfect for busy weeknights.
- Flavorful Combination: The sweet honey and savory garlic create a deliciously balanced sauce that complements the shrimp beautifully.
- Versatile Serving Options: Serve it over rice or quinoa, or even as a filling for tacos or lettuce wraps!
- Healthy Meal: With lean protein from the shrimp and wholesome ingredients, this dish is both nutritious and satisfying.
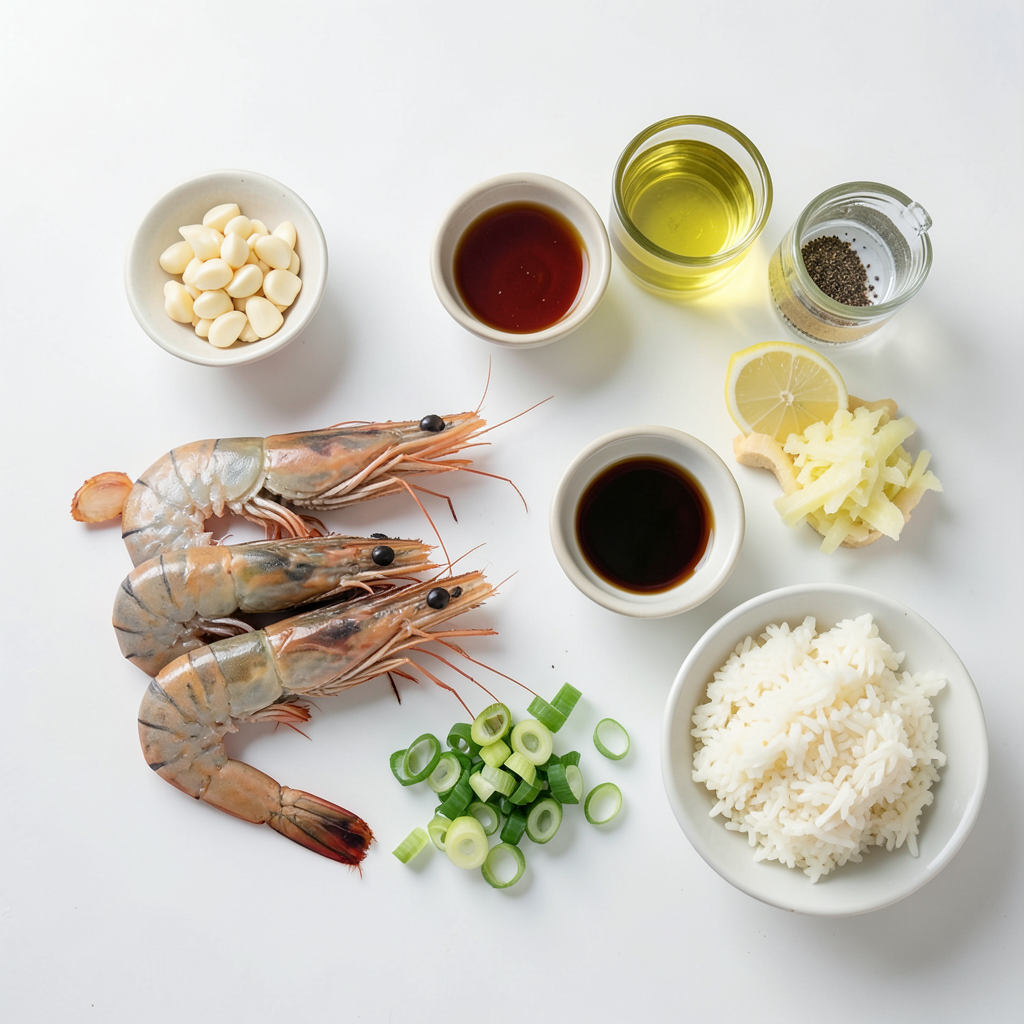
Ingredients
Complete list of ingredients
To make honey garlic shrimp, you will need:
- 1 pound large shrimp, peeled and deveined
- 2 tablespoons honey
- 4 cloves garlic, minced
- 1 tablespoon soy sauce (or tamari for gluten-free)
- 1 tablespoon olive oil
- 1 teaspoon fresh ginger, grated
- 1 teaspoon lemon juice
- Salt and pepper to taste
- 2 green onions, sliced (for garnish)
- Cooked rice or quinoa (for serving)
Substitutes for allergy concerns
If you have allergies, here are some great swaps:
- Use coconut aminos instead of soy sauce for a soy-free option.
- Swap honey for maple syrup if you want a vegan choice.
- Choose vegetable oil if you cannot use olive oil.
Recommended brands for quality
For the best taste, I suggest these brands:
- Wild caught shrimp from your local seafood market.
- Manuka honey for a rich, complex flavor.
- San-J or Bragg's for high-quality soy sauce or tamari.
- California Olive Ranch for a great olive oil choice.
Step-by-Step Instructions
Preparing the honey garlic sauce
To make the honey garlic sauce, start with a small bowl. Add 2 tablespoons of honey. Next, add 4 cloves of minced garlic. Then, mix in 1 tablespoon of soy sauce. If you need a gluten-free option, use tamari. Now, add 1 teaspoon of freshly grated ginger. Squeeze in 1 teaspoon of lemon juice. Finally, sprinkle in some salt and pepper to taste. Whisk these ingredients together until they blend well. Set the bowl aside.
Cooking the shrimp perfectly
Heat a large skillet over medium heat. Pour in 1 tablespoon of olive oil. Once the oil is hot, add 1 pound of peeled and deveined shrimp. Cook the shrimp for about 2 to 3 minutes on one side. They will turn pink when ready. Flip the shrimp over to cook the other side. Pour the honey garlic sauce over the shrimp. Stir to coat them evenly. Cook for another 2 to 3 minutes. The shrimp should be fully cooked, and the sauce will thicken slightly.
Final touches and plating
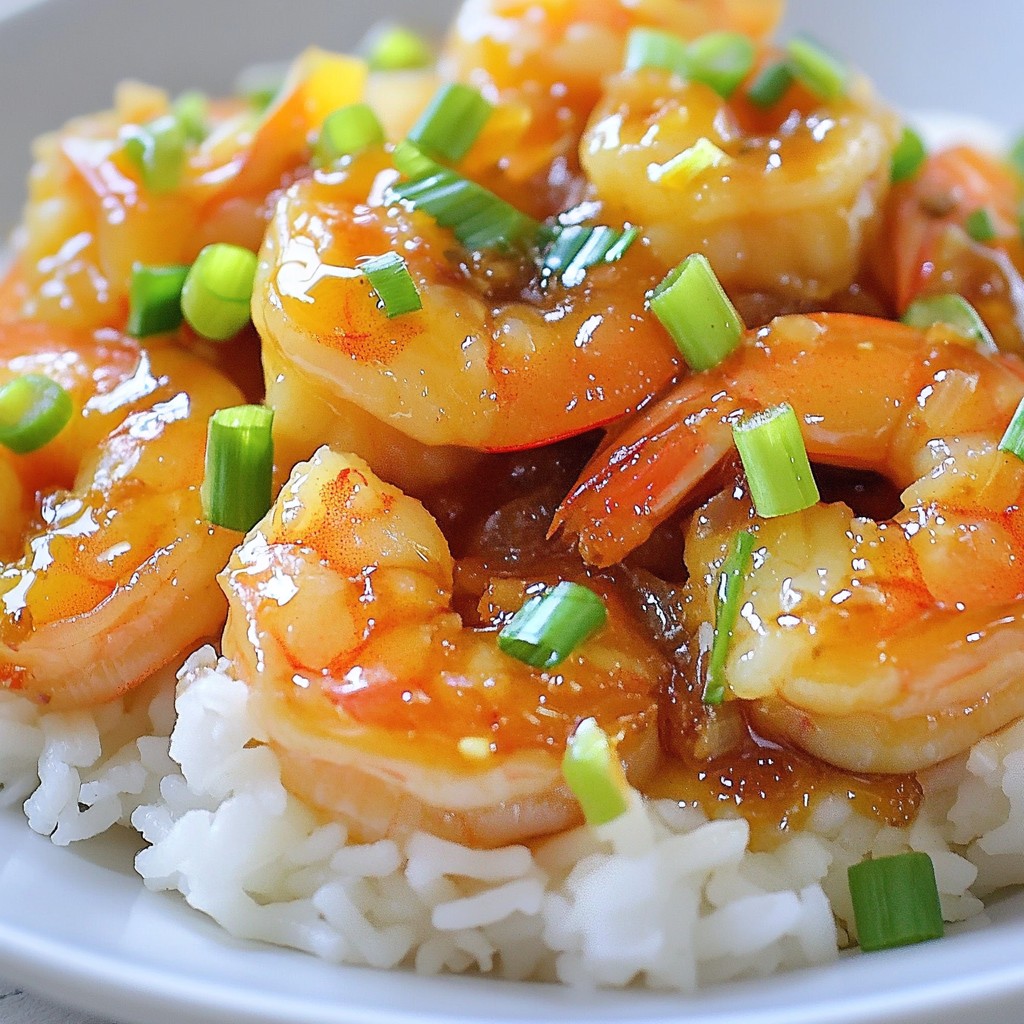
Once done, remove the skillet from heat. Stir in 2 sliced green onions for a fresh touch. Serve the shrimp over cooked rice or quinoa. Drizzle any remaining sauce on top. Enjoy this quick and tasty meal!
Tips & Tricks
How to peel and devein shrimp efficiently
To peel shrimp, start at the head and pull off the shell. Use your fingers to remove the legs, too. For deveining, look for the dark line on the back. Use a small knife to carefully lift it out. You can also use a shrimp deveiner for speed. This tool makes the job quick and easy.
Best cooking techniques for tender shrimp
Cooking shrimp takes just a few minutes. Use medium heat to avoid overcooking. Start with a hot skillet and add olive oil. Place the shrimp in a single layer. Cook them for 2-3 minutes on one side until they turn pink. Flip them over and pour in the sauce. Cook for another 2-3 minutes. This keeps them juicy and tender.
Ways to add extra flavor to the dish
To boost flavor, try adding fresh herbs like cilantro or basil. You can also sprinkle in some red pepper flakes for heat. A splash of lime juice brightens the dish too. If you want a deeper taste, add a dash of sesame oil. Mixing in vegetables like bell peppers or snap peas can add color and crunch.
Pro Tips
- Fresh Ingredients: Use fresh shrimp for the best flavor and texture. Frozen shrimp can be used but should be thawed completely before cooking.
- Adjust the Sweetness: If you prefer a less sweet sauce, reduce the amount of honey or add a splash of vinegar for a tangy contrast.
- Don’t Overcook: Shrimp cook quickly; avoid overcooking them to maintain their tenderness. They are done when they turn pink and opaque.
- Garnishing: Adding fresh herbs like cilantro or parsley can enhance the dish's flavor and presentation. Consider using them as a garnish for an extra touch.
Variations
Alternative proteins (chicken, tofu, etc.)
You can swap shrimp for other proteins. Chicken works well and has a mild taste. Use boneless chicken breast or thighs. Cut them into bite-sized pieces. Cook them for about 5-7 minutes before adding the sauce. Tofu is another great option. Use firm tofu, press it to remove moisture, and cut it into cubes. Cook until golden brown for extra flavor.
Serving suggestions (vegetable pairings, sauces)
Pair honey garlic shrimp with colorful veggies. Broccoli, bell peppers, or snap peas add crunch and nutrition. You can stir-fry them in the same pan. This saves time and boosts flavor. For sauces, a splash of soy sauce or a squeeze of lime brightens the dish. You can also try a spicy sauce for a kick.
Modifications for dietary preferences (low-carb, gluten-free)
If you want a low-carb meal, skip the rice and serve shrimp over zucchini noodles. This keeps it light and fresh. For gluten-free needs, use tamari instead of soy sauce. Always check labels on sauces to avoid hidden gluten. You can still enjoy the sweet and savory taste while sticking to your diet.
Storage Info
How to store leftovers properly
To store leftovers of honey garlic shrimp, let them cool first. Then, place them in an airtight container. Make sure to seal it tightly to keep out air. Store in the fridge for up to three days. Keeping the shrimp and sauce together helps maintain flavor and moisture.
Reheating tips for optimal taste
When reheating, use a skillet over low heat. This method warms the shrimp evenly. Add a splash of water or broth to keep them moist. Stir gently to prevent sticking. Heat until warm, about 5-7 minutes. Avoid using the microwave, as it can make shrimp chewy.
Freezing options and best practices
You can freeze honey garlic shrimp, but it’s best to do so before cooking. Place raw shrimp in a freezer-safe bag. Add the honey garlic sauce, seal it, and label it. It can last for up to three months. When ready to cook, thaw in the fridge overnight. Then cook as directed to enjoy fresh flavors.
FAQs
Can I use frozen shrimp for this recipe?
Yes, you can use frozen shrimp for this recipe. Just be sure to thaw them first. Place them in a bowl of cold water for about 15-20 minutes. Once thawed, peel and devein them if needed. Using frozen shrimp can save you time and still give you great taste.
How long do honey garlic shrimp last in the fridge?
Honey garlic shrimp can last in the fridge for about 3 days. Store them in an airtight container. When you're ready to eat, just reheat them gently. This way, they stay juicy and tasty.
What can I serve with honey garlic shrimp?
You can serve honey garlic shrimp with cooked rice or quinoa for a filling meal. Add some steamed vegetables for a healthy touch. Broccoli, snap peas, or bell peppers work well. If you want to add more flavor, try a simple side salad with a zesty dressing.
This blog post covered everything you need to make honey garlic shrimp. We talked about ingredients, substitutes, and the best brands. You learned step-by-step instructions for making the sauce and cooking the shrimp just right. I shared tips on peeling shrimp and cooking techniques for tenderness. You also discovered variations with proteins and dietary options. Finally, we discussed how to store leftovers and answered common questions. With this guide, you can create a delicious meal that suits your taste. Enjoy your cooking journey, and make it your own!